.png)
Server Room Water Leak Monitoring for Cooling Equipment and Floor Zones
A small water leak can become a server room incident before anyone notices a puddle. Condensate can spill from cooling equipment, a pipe can weep in a nearby riser, stormwater can track through a penetration, and water can move under a raised floor long before it reaches the doorway.
Good leak monitoring starts with routes, not guesses. Water follows gravity, floor falls, cable paths, tray edges, bunds and gaps. A single sensor near the entrance may confirm that water has already travelled across the room, but it may miss the early signs near the source.
Server room water leak monitoring works best when sensors are placed around likely collection points and travel paths, then linked to an alarm process that tells the right person exactly where to inspect.

Start by mapping where water could come from
Server rooms often sit near building services. That can include chilled water pipework, condensate drains, hydraulic services, fire services, roof drainage, toilets, kitchens, plant rooms or risers. Even when no pipe runs through the room, water may enter from an adjoining space, ceiling void, wall penetration or floor slab.
The first step is to walk the space and list the likely sources. Break them into practical groups.
Cooling related water
Air-conditioning and close control cooling are common leak sources. Look at condensate trays, drain lines, pumps, valves, flexible connections and the floor beneath the unit. A blocked drain or failed pump may not release a large volume straight away, but it can create enough water to threaten equipment.
Building services water
Nearby pipework can create risk even if it sits outside the server room. Water can track along pipe insulation, cable trays, conduits and slab falls. A leak in a plant area can appear in a server room through a floor penetration or under a wall.
External water entry
Heavy rain, roof faults and poor drainage can send water into unexpected places. This risk depends on the building, but it should not be ignored. Server rooms on lower floors may also face water entering from corridors or adjacent tenancies.
Internal activities
Cleaning, maintenance and fit-out works can create temporary leak risks. A mop bucket spill or disturbed drain line is less dramatic than a burst pipe, but the result near electrical services can still be serious.
A useful site assessment asks a simple question at each point: if water appeared here, where would it travel first?
Choose point detection or route coverage
Water detection sensors are not all used the same way. The right format depends on whether water is expected to collect in one defined area or move along a path.
Monnit offers water detection formats suited to common monitoring tasks, including point-style sensing and detection rope arrangements. The choice should come from the physical layout and the risk being monitored.
Point detection
Detection rope
Best for defined collection areas, such as drip trays, low spots, condensate pump bases or known drain points.
Best for longer areas, such as the front of cooling units, around a perimeter, beneath a raised floor or along a likely water path.
Use point sensors for defined collection areas
A point sensor is useful when water is likely to arrive at a specific spot. A drip tray is a good example. If the tray catches overflow, a point sensor can give an early signal without needing to cover a large floor area.
Point detection also suits spaces where physical access is tight. A compact sensor can be easier to mount or place where a rope would be awkward.
The risk is false confidence. A point sensor only monitors the place where it is installed. If the leak appears beside the tray, behind a unit or along the room perimeter, the sensor may stay dry.
Use detection rope for longer paths
Detection rope suits areas where water may spread or travel before settling. It can cover more distance around cooling equipment, along a wall, beneath a raised floor or across the front of vulnerable services.
A rope also helps when the exact leak point is uncertain. For example, a cooling unit may have several possible leak sources. Rather than monitoring one small tray only, a rope can cover the floor area where water is likely to emerge.
The practical limit is placement. The rope must sit where water will touch it early. It also needs protection from crushing, snagging and accidental movement during maintenance.
Place sensors where water will reach them early
Sensor location matters more than convenience. A sensor on a dry high point may look tidy and be easy to inspect, but it will not help if water pools 300 mm away beside an electrical cabinet.
Look carefully at the room. Floors are rarely perfectly flat. Raised floor panels can settle. Concrete may fall towards a doorway, drain, cable entry or wall. Bunds can stop water, but they can also divert it. Cable trays, conduits and penetrations can carry water across zones.
To improve placement, check these details before installing sensors:
Low points where water naturally collects
The base of air-conditioning units and condensate drain paths
Drip trays, tundishes, pumps and drain connections
Edges of raised floor areas and underfloor routes
Cable penetrations through walls or floors
Doorways where water could enter from a corridor
Bunds, barriers and plinths that may divert water
Areas that cleaners or technicians may disturb
When working under raised floors, do not assume water will be visible from the room above. Water can travel below floor level and stay hidden until it reaches cable routes or equipment bases. Detection rope can be useful in these zones, but it needs a documented layout so staff can find it again.

Design alarms so people know what to do next
A leak alarm should not leave the recipient guessing. “Water detected” is better than no warning, but it does not tell a technician where to go or what to inspect.
Each alarm should identify:
The building or site
The room or plant area
The exact monitored location
The likely source or zone
The first response action
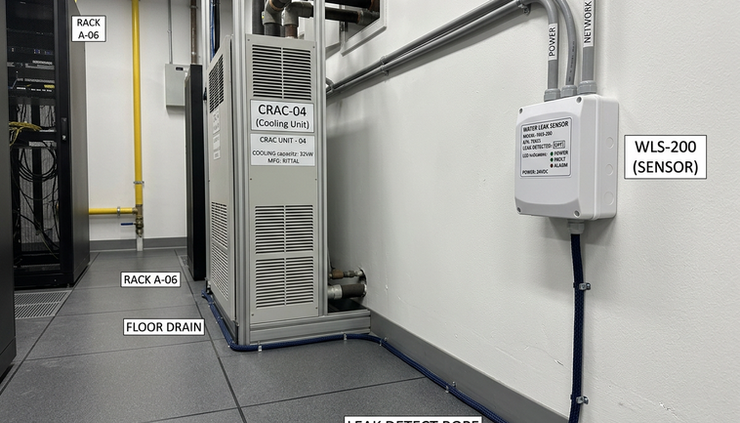
A clear label might describe the monitored point as `Server Room 1, CRAC Unit 2 condensate tray` or `Main Comms Room, raised floor east wall rope`. The naming should match site drawings, rack layouts or maintenance records.
The response plan should fit the risk. A sensor in a condensate tray may call for checking the drain and pump. A rope alarm under a raised floor may require isolating nearby equipment, inspecting cable entries and checking adjacent rooms. A perimeter alarm near a door may point people towards the corridor or external water entry.
The alarm path also needs testing from the installed position. Plant rooms, basements and underfloor spaces can create communication problems. If the sensor uses wireless communication, test it after the room is live, with doors closed and normal equipment operating. Metal enclosures, dense walls and electrical equipment can all affect signal performance.
It is better to find a communication dead spot during commissioning than during a leak.
Confirm the liquid and the environment
Water detection products should only be used for the liquids and conditions they are meant to monitor. A sensor selected for water should not be assumed suitable for fuels, solvents, oils, glycol mixtures or every chemical spill.
This matters in plant areas. Cooling systems may involve treated water or additives. Cleaning products may be present. Adjacent services may carry other liquids. The correct choice depends on the intended medium, the concentration, the exposure time and the surrounding environment.
Before selection, confirm:
The liquid to be detected
Whether the liquid is clean water, condensate, treated water or another medium
The expected temperature and humidity
Whether the sensor may face dust, grime or cleaning chemicals
The mounting method and cable protection needs
Whether people, trolleys or equipment may damage the sensor
The environment can also affect reliability. A rope in a dirty underfloor zone may collect dust or debris. A sensor near a cleaning route may be bumped. A device in a plant room may face heat, condensation or limited access.
The aim is not to overcomplicate the system. The aim is to avoid using a sensor outside its proper purpose.
Document the layout before it is forgotten
Leak monitoring systems are often simple at the start. Then equipment gets moved, racks are added, floor panels change, pipework is altered and labels fade. Without documentation, a future technician may not know what each alarm means or where each sensor sits.
A good layout record should include:
Sensor names and device IDs
A simple floor plan or marked-up drawing
Photos of installed locations
Rope routes and start and end points
Areas covered and areas not covered
Alarm recipients and escalation steps
Test dates and maintenance notes
This record does not need to be complex. It needs to be accurate and easy to find. Store it with the maintenance documentation and update it when the room changes.
Photos are especially useful for sensors under raised floors or behind cooling units. Include a wider photo for context and a close-up photo showing the device position. If a rope passes under floor panels, mark the relevant panels so technicians can access the right section without lifting half the room.
Build testing into routine maintenance
A water detection system is not a set-and-forget installation. Sensors can move. Ropes can be contaminated. Floor layouts can change. Alarm contacts can become outdated. A maintenance routine keeps the system ready when it is needed.
A controlled functional test should confirm that the sensor detects water and that the alarm reaches the right people. The test method must suit the product instructions and the site rules. Avoid uncontrolled wetting near electrical equipment, and never create a new hazard to test a protection system.
Routine checks should cover:
The sensor or rope is still in the correct position
The sensing surface is clean enough to work
Cables and fixings are not damaged
The device label still matches the alarm label
Alarm messages identify the correct zone
Notifications reach current recipients
Batteries or power supplies are within service requirements
Nearby works have not changed the water path
For detection rope, inspection should include the full covered route where practical. Look for kinks, crushed sections, dirt build-up and sections that have been lifted off the floor. If water is likely to pass underneath the rope without touching it, the position needs adjustment.
For point sensors, check that the sensor still sits in the collection area. A drip tray sensor that has been moved aside during servicing may not get returned to the right spot.
Avoid common placement mistakes
Many leak monitoring problems come from reasonable decisions made under time pressure. The device is placed where it is easy to install, labels are kept short, testing is postponed, and drawings are updated later. These shortcuts can reduce the value of the system.
Watch for these common issues.
Placing one sensor at the door
This may detect water leaving or entering the room, but it can miss leaks around cooling plant or below the floor.
Mounting sensors above the water path
A tidy wall-mounted position is not useful if water pools at floor level without touching the sensor.
Ignoring floor falls
A leak may travel away from the expected area. Check where water would move, not just where the source sits.
Leaving alarm messages too vague
An alarm that does not name the zone slows the response. Clear naming saves time when minutes matter.
Forgetting access for inspection
Sensors need to be found, cleaned and tested. Place them where they can do their job and still be maintained.
Assuming all liquids are the same
Confirm compatibility before using water detection products near fuels, solvents, chemicals or treated liquids.
A practical setup for a typical server room
A small server room with one or two cooling units may only need a simple arrangement, but it should still be planned.
A practical layout may include point detection in condensate trays and detection rope on the floor in front of cooling equipment. If the room has a raised floor, another rope may monitor the underfloor area where water would travel towards cable routes. If pipes or wet areas sit nearby, perimeter coverage near the relevant wall or doorway may make sense.
The alarm names should separate these zones. For example:
`Server Room, Cooling Unit 1 tray`
`Server Room, Cooling Unit 2 floor rope`
`Server Room, raised floor west zone`
`Server Room, corridor entry point`
This level of detail helps the first responder act quickly. It also helps maintenance staff test the right device and update the right record.
Placement should come before product count. More sensors do not automatically mean better coverage. A smaller number of well-positioned sensors can perform better than a scattered set that misses the likely water paths.
The best leak alarm is specific
Water near server equipment or electrical services can cause disruption long before a large puddle forms. The best monitoring plan treats leaks as physical events. It asks where water could start, where it could travel and where it can be detected early.
Use point sensors for defined collection areas. Use detection rope for longer routes and floor zones. Place each sensor where water is likely to reach it, not just where installation is convenient. Then make every alarm specific enough to guide the response.
A good system is easy to understand months after installation. The sensor is labelled, the alarm names the location, the drawing shows the coverage, and maintenance staff know how to test it. That is what turns leak detection from a passive device into a useful part of server room protection.